Interact with a smart contract
Overview
This tutorial shows how to interact with a smart contract on Ronin using Ronin JSON-RPC endpoints. In the course of the tutorial, you complete the following tasks:
- Review the sample smart contract along with its ABI (the schema document used by a web3 client to interact with a contract after it’s deployed to a blockchain).
- Create and deploy your own smart contract based on the sample contract.
- Interact with the smart contract to retrieve some information.
Prerequisites
- Node.js or your preferred web3 client written in another language.
- npm or yarn for package installation. This tutorial uses npm.
- A Ronin Wallet address.
- Basic knowledge of HTTP.
- Basic knowledge of JavaScript.
- Basic knowledge of JSON-RPC. For more information, see the JSON-RPC specification.
- Basic knowledge of Solidity, the language for writing smart contracts.
Environment
Throughout this tutorial, you use the public RPC endpoint for the Saigon testnet: https://saigon-testnet.roninchain.com/rpc.
We recommend using the public endpoint only for testing. For production, make sure to use Sky Mavis's private endpoint https://api-gateway.skymavis.com/rpc/testnet.
Step 1. Create a project
- Create a new directory for your project and open the terminal in that directory:
cd ~/
mkdir ronin_rpc_contract_sample
cd ronin_rpc_contract_sample
- Initialize a new Node.js project:
npm init -y
You should see output similar to this:
Wrote to ***/ronin_rpc_contract_sample/package.json:

{
  "name": "ronin_rpc_sample",
  "version": "1.0.0",
  "description": "",
  "main": "index.js",
  "scripts": {
    "test": "echo \"Error: no test specified\" && exit 1"
  },
  "keywords": [],
  "author": "",
  "license": "ISC"
}
- Install the
ethers.jslibrary:
npm install ethers@5.7.2
This tutorial uses ethers.js version 5.7.2.
Step 2. Create and run a script
Create a script to update the value of a smart contract and read it after.
This is a sample smart contract called SimpleContract:
pragma solidity ^0.8.0;

contract SimpleContract {
    uint256 private value;

    // Event triggered when the value is set
    event ValueSet(uint256 newValue);

    // Set a new value and trigger the ValueSet event
    function setValue(uint256 newValue) public {
        value = newValue;
        emit ValueSet(newValue);
    }

    // Retrieve the current value
    function getValue() public view returns (uint256) {
        return value;
    }
}
This is the ABI of the SimpleContract contract:
[
  {
    "anonymous": false,
    "inputs": [
      {
        "indexed": false,
        "internalType": "uint256",
        "name": "newValue",
        "type": "uint256"
      }
    ],
    "name": "ValueSet",
    "type": "event"
  },
  {
    "inputs": [],
    "name": "getValue",
    "outputs": [
      {
        "internalType": "uint256",
        "name": "",
        "type": "uint256"
      }
    ],
    "stateMutability": "view",
    "type": "function"
  },
  {
    "inputs": [
      {
        "internalType": "uint256",
        "name": "newValue",
        "type": "uint256"
      }
    ],
    "name": "setValue",
    "outputs": [],
    "stateMutability": "nonpayable",
    "type": "function"
  }
]
The SimpleContract smart contract is already deployed on the Saigon testnet at this address: 0x55634BbAfBd297b19472272f9E1FFAe4220040fe. You can view it in the Ronin app.
Optionally, you can copy the code of the SimpleContract contract and deploy it as a new contract following our other tutorial: Deploy and verify a smart contract.
If you do so, make sure to modify the contract address in the subsequent sections of this tutorial.
Now, you need to update the value field inside this smart contract, and read it afterward.
- Create a file called
interact_contract.jsand enter the following code:
const { ethers } = require("ethers");
const { JsonRpcProvider } = require("@ethersproject/providers");
const { resolveProperties } = require("@ethersproject/properties");

// A wrapper to workaround the gasPrice issue in etherjs version 5 after
// London hardfork when sending transaction
//
// This is a modified version based on @ethersproject/abstract-provider
class WrappedJsonProvider extends JsonRpcProvider {
  async getFeeData() {
    const { block, gasPrice } = await resolveProperties({
      block: this.getBlock("latest"),
      gasPrice: this.getGasPrice().catch((_) => {
        return null;
      }),
    });

    let lastBaseFeePerGas = null,
      maxFeePerGas = null,
      maxPriorityFeePerGas = null;

    if (block && block.baseFeePerGas) {
      lastBaseFeePerGas = block.baseFeePerGas;
      maxPriorityFeePerGas =
        gasPrice != null ? gasPrice : BigNumber.from("1500000000");
      maxFeePerGas = block.baseFeePerGas.mul(2).add(maxPriorityFeePerGas);
    }

    return { lastBaseFeePerGas, maxFeePerGas, maxPriorityFeePerGas, gasPrice };
  }
}

// Initialize the provider
const provider = new WrappedJsonProvider(
  "https://saigon-testnet.roninchain.com/rpc",
);
This code imports the required libraries and initializes the node provider, which is the Ronin RPC endpoint.
- Connect to the smart contract and define the wallet.
To run this code, you need to replace YOUR_PRIVATE_KEY with the private key from your Ronin Wallet.
To retrieve the private key, open the Ronin Wallet browser extension, go to Account > Manage, select your account, and then click View private key.
const privateKey = 'YOUR_PRIVATE_KEY';
const contractAddress = '0x55634BbAfBd297b19472272f9E1FFAe4220040fe';
const contractAbi = [<ABI above>];
const wallet = new ethers.Wallet(privateKey, provider);

// Create a contract object using the contract address and ABI
const contract = new ethers.Contract(contractAddress, contractAbi, wallet);
- Add two functions for interacting with the smart contract: one for setting a new value and one for retrieving the current value.
// Set a new value:
async function setValue(valueToSet) {
  const transaction = await contract.setValue(valueToSet);
  console.log(transaction);

  // Wait for the transaction to be confirmed
  await transaction.wait();

  console.log("Transaction complete!");
}

// Get the current value:
async function getValue() {
  const value = await contract.getValue();
  console.log("Current value:", value.toString());
}

(async () => {
  // Call the setValue function with the necessary parameters
  const valueToSet = 10;
  await setValue(valueToSet);

  // Call the getValue function after setValue
  await getValue();
})();
Description of the functions:
setValue(privateKey, valueToSet): This function allows you to set a new value in the smart contract. It takes two parameters:privateKey(the private key of the wallet used to sign the transaction) andvalueToSet(the value you want to set).getValue(): This function retrieves the current value from the smart contract. The RPC method that this function uses is as follows:
{
  "method": "eth_call",
  "params": [
    {
      "to": "0x55634bbafbd297b19472272f9e1ffae4220040fe",
      "data": "0x20965255"
    },
    "latest"
  ],
  "id": 70,
  "jsonrpc": "2.0"
}
- Execute the code:
node interact_contract.js
You should see output similar to this:
{
  nonce: 55927,
  gasPrice: BigNumber { _hex: '0x04a817c800', _isBigNumber: true },
  gasLimit: BigNumber { _hex: '0x5d68', _isBigNumber: true },
  to: '0x55634BbAfBd297b19472272f9E1FFAe4220040fe',
  value: BigNumber { _hex: '0x00', _isBigNumber: true },
  data: '0x55241077000000000000000000000000000000000000000000000000000000000000000a',
  chainId: 202601,
  v: 4078,
  r: '0x187f247947ff8ed3e1c98c75204fd0dfabf2bf1aa5713f9794480c69d2f93583',
  s: '0x2881add7d7d886fcbe34312300070f1ac218b346b4600464e3444618880b448a',
  from: '0xf6fd5FcA4Bd769BA495B29B98dba5F2eCF4CEED3',
  hash: '0x6b692983d05e664ee80dc29364098b6f5681c3ccdd19ef6a5e5054d176610a4f',
  type: null,
  confirmations: 0,
  wait: [Function (anonymous)]
}

Transaction complete!
Current value: 10
Step 3. Verify the result
Verify the transaction detail
Use the Ronin app
Open the Ronin app and paste the transaction hash 0x6b692983d05e664ee80dc29364098b6f5681c3ccdd19ef6a5e5054d176610a4f into the search field.
Use Ronin JSON-RPC
Make a request to the eth_getTransactionReceipt method by running the following command:
curl --location 'https://saigon-testnet.roninchain.com/rpc' \
--header 'Content-Type: application/json' \
--data '{
	"jsonrpc":"2.0",
	"method":"eth_getTransactionReceipt",
	"params":[
		"0x6b692983d05e664ee80dc29364098b6f5681c3ccdd19ef6a5e5054d176610a4f"
	],
	"id":1
}'
The response is the transaction's receipt:
{
  "jsonrpc": "2.0",
  "id": 1,
  "result": {
    "blockHash": "0xefb90a99dcb72974390683e2da12cd53110e0bdaf603134f23e8d9faf7e99180",
    "blockNumber": "0x11706de",
    "contractAddress": null,
    "cumulativeGasUsed": "0x5c3f",
    "effectiveGasPrice": "0x4a817c800",
    "from": "0xf6fd5fca4bd769ba495b29b98dba5f2ecf4ceed3",
    "gasUsed": "0x5c3f",
    "logsBloom": "0x00000000000000000000000000000000000080000000000000000000000000000000000000000000000000000000000000400000000000000000000000000000000000000000000000000000000000000000000000000000000000000000000000000000000000008000000000000000000000000000000000000000000000000000000000000000000000000000000100000000000000000000000000000000000000000000000000000000000000000000000000000000000000000080000000000000000000000000000000000000000000000000000000000000000000000000000000000000000000000000000000000000000000000000000800000000",
    "status": "0x1",
    "to": "0x55634bbafbd297b19472272f9e1ffae4220040fe",
    "transactionHash": "0x6b692983d05e664ee80dc29364098b6f5681c3ccdd19ef6a5e5054d176610a4f",
    "transactionIndex": "0x0",
    "type": "0x0",
    "logs": [
      {
        "address": "0x55634bbafbd297b19472272f9e1ffae4220040fe",
        "topics": [
          "0x012c78e2b84325878b1bd9d250d772cfe5bda7722d795f45036fa5e1e6e303fc"
        ],
        "data": "0x000000000000000000000000000000000000000000000000000000000000000a",
        "blockNumber": "0x11706de",
        "transactionHash": "0x6b692983d05e664ee80dc29364098b6f5681c3ccdd19ef6a5e5054d176610a4f",
        "transactionIndex": "0x0",
        "blockHash": "0xefb90a99dcb72974390683e2da12cd53110e0bdaf603134f23e8d9faf7e99180",
        "logIndex": "0x0",
        "removed": false
      }
    ]
  }
}
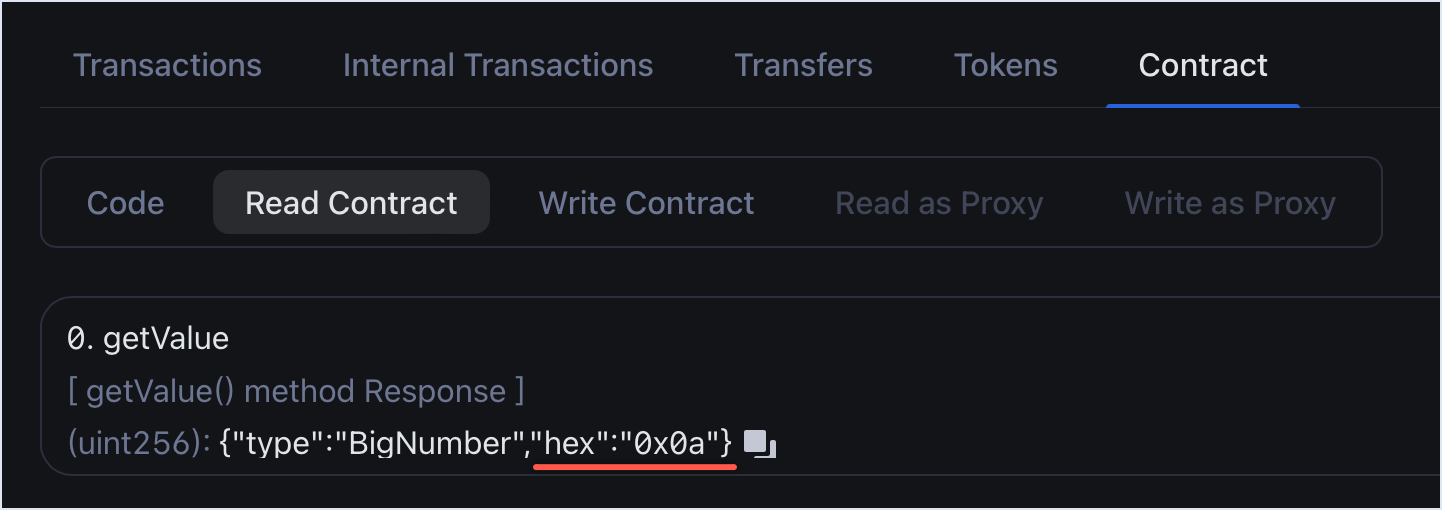
Read the smart contract
Use the Ronin app
Open the Ronin app to view the contract.
The value is shown under getValue > hex:
Use Ronin JSON-RPC
Make a request to the eth_call method by running the following command:
curl --location 'https://saigon-testnet.roninchain.com/rpc' \
--header 'Content-Type: application/json' \
--data '{
  "method": "eth_call",
  "params": [
    {
      "to": "0x55634bbafbd297b19472272f9e1ffae4220040fe",
      "data": "0x20965255"
    },
    "latest"
  ],
  "id": 70,
  "jsonrpc": "2.0"
}'
The response is the value of the smart contract:
{
  "jsonrpc": "2.0",
  "id": 70,
  "result": "0x000000000000000000000000000000000000000000000000000000000000000a"
}
Step 4. Listen for events
The SimpleContract smart contract emits an event called ValueSet every time setValue is called. Let's set up an event listener so that you can receive updates whenever a new value is set in the contract.
- Create a file called
listen_contract.jsand paste the following code:
// Import ethers.js library
const ethers = require('ethers');

// Contract address and ABI
const contractAddress = '0x55634BbAfBd297b19472272f9E1FFAe4220040fe';
const contractABI = [<ABI above>];

// Create an ethers.js provider
const provider = new ethers.providers.JsonRpcProvider('https://saigon-testnet.roninchain.com/rpc');

// Create a contract instance
const contract = new ethers.Contract(contractAddress, contractABI, provider);

// Event listener for the 'ValueSet' event
contract.on('ValueSet', (newValue) => {
  console.log('New value set:', newValue.toString());
});

// Keep the script running indefinitely
setTimeout(() => {}, 86400000); // 24 hours
The on method of the contract instance is used to listen for the ValueSet event. Whenever this event is emitted by the smart contract, the callback function is executed, printing the new value set. Here's the RPC method that this function uses:
{
  "method": "eth_getLogs",
  "params": [
    {
      "fromBlock": "0x116f601",
      "toBlock": "0x116f60b",
      "address": "0x55634bbafbd297b19472272f9e1ffae4220040fe",
      "topics": [
        "0x012c78e2b84325878b1bd9d250d772cfe5bda7722d795f45036fa5e1e6e303fc"
      ]
    }
  ],
  "id": 84,
  "jsonrpc": "2.0"
}
The setTimeout function ensures that the script is running for 24 hours. You can adjust the duration as needed.
By running this script, you can listen for the ValueSet event emitted by the contract and receive updates whenever a new value is set.
- Execute the code:
node listen_contract.js
Try calling setValue() to the contract with value set to 10, and you can see the following log in the console:
New value set: 10