Validate ID tokens
Overview
This guide explains how to verify the validity of ID tokens issued by Mavis ID.
When a user grants authorization to a client app, Mavis ID responds with an ID token containing user information.
The ID token is a JSON Web Token (JWT) that contains the user’s information and is signed by Sky Mavis.
After receiving the ID token, you need to verify its authenticity to ensure that the user is who they claim to be. This involves sending the ID token to your backend server. Once verified, your backend server can issue an access token, allowing the user to interact with your backend server securely.
Steps
Step 1. Obtain the public keys
Use Sky Mavis's public keys to verify the ID token's signature. The keys are located at https://id.skymavis.com/.well-known/jwks.json.
By default, the signing key is rotated every 6 weeks. This means you need to programmatically or manually update your keys as they rotate. The previous keys remain valid for 7 days after rotation to allow time for you to make the update.
The following example shows two public keys: the current key used to sign all new tokens, and the previous key that has been rotated out. The example is a JSON Web Key Set (JWKS) object that contains a keys array of JWK keys. Each key contains the key type (kty), the key use (use), the key ID (kid), the curve (crv), and the x and y coordinates of the public key.
{
  "keys": [
    {
      "kty": "EC",
      "use": "sig",
      "kid": "018e085d-353d-73ac-8006-c43f376631f1",
      "crv": "P-256",
      "x": "9rB5mWnYHdobqkn8wYG4BzM7-uC5-QOokatjct3DQU8",
      "y": "cECJGhKRW__VSuYS7jxtnMDArwkrHff_P9B8xHMMhYI"
    },
    {
      "kty": "EC",
      "use": "sig",
      "kid": "018e085d-2e3f-7474-8007-21c0408ba33e",
      "crv": "P-256",
      "x": "CGlCzoxUjGUoGnryNnmzwzyLgzqwxaSrieb0ufxliiw",
      "y": "pK3QizTfodV9CFGnV-hC9dLEzBw6Gp7zldWbMWPqbog"
    }
  ]
}
Step 2. Verify the ID token
Verify manually
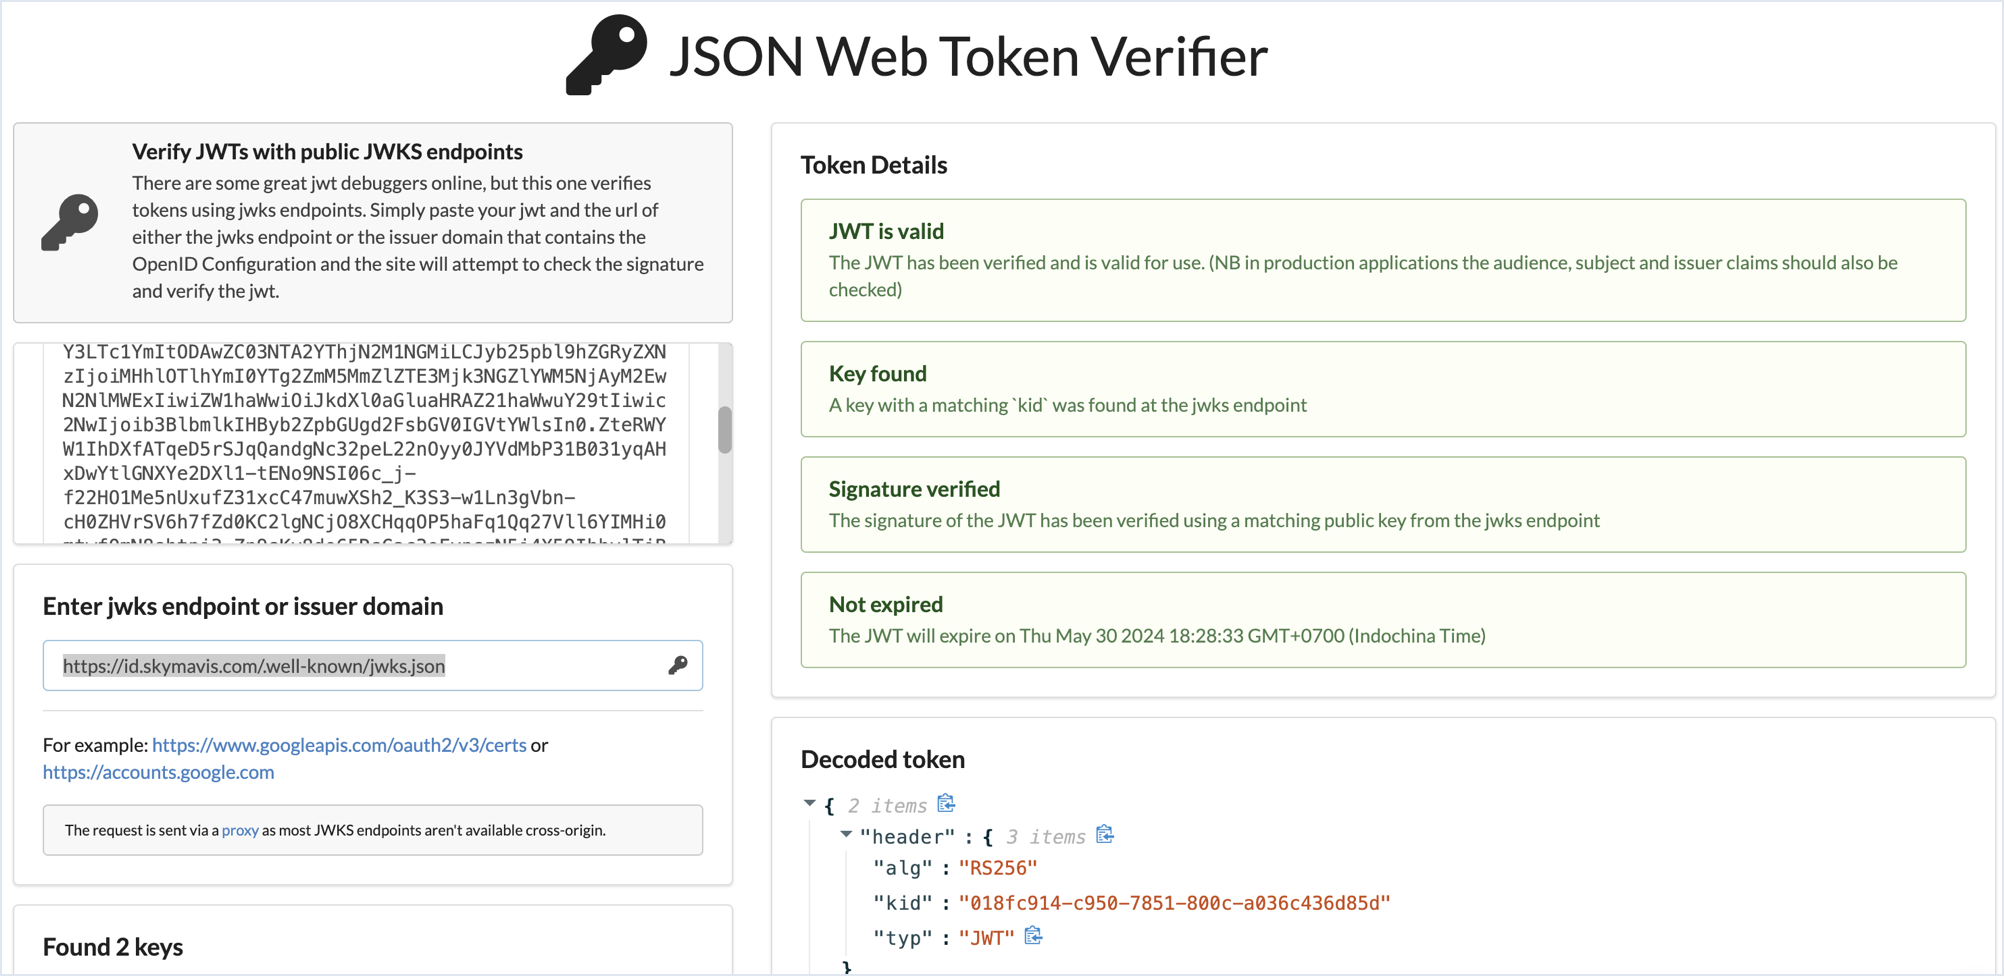
To verify a JWT (JSON Web Token) token manually, follow these steps:
- Copy the JWT token from the Mavis ID response.
- Visit JSON Web Token Verifier.
- Paste the JWT token into the Enter JWT field.
- Paste the URL of the JWKs endpoint (
https://id.skymavis.com/.well-known/jwks.json) into the Enter jwks endpoint or issuer domain field. - Review the decoded token to ensure it contains the expected user information.
Verify programmatically
- Get the client ID for your app from the Developer Console: go to the Developer Console, select your app, then select ID Service in the list of products. Look for the client ID in the Client credentials section.

- Use the following code snippets:
- Go
- Python
- JavaScript
package main

import (
	"context"
	"encoding/json"
	"fmt"
	"net/http"

	"github.com/coreos/go-oidc/v3/oidc"
)

var (
	issuer   = "https://id.skymavis.com"
  // Example client ID
	clientID = "52b85454-dd6f-4b0f-8d7a-9e30a33e387e"
	certsURL = "https://id.skymavis.com/.well-known/jwks.json"

	// The Application Audience (AUD) tag for your application

	config = &oidc.Config{
		ClientID: clientID,
	}

	keySet   = oidc.NewRemoteKeySet(context.TODO(), certsURL)
	verifier = oidc.NewVerifier(issuer, keySet, config)
)

// AuthMavisIDRequest represents the request body for authentication with Sky Mavis
type AuthMavisIDRequest struct {
	IDToken string `json:"id_token"`
}

// AuthMavisIDResponse body for auth with Sky Mavis
type AuthMavisIDResponse struct {
	AccessToken string `json:"access_token"`
	// Other information
}

// AuthMavisID is a handler to verify a Mavis ID token and issue an access token
func AuthMavisID(w http.ResponseWriter, r *http.Request) {

	req := &AuthMavisIDRequest{}

	if err := json.NewDecoder(r.Body).Decode(req); err != nil {
		http.Error(w, "malformed request body", 400)
		return
	}

	// Verify the ID token
	id, err := verifier.Verify(r.Context(), req.IDToken)
	if err != nil {
		http.Error(w, fmt.Sprintf("ID token is not valid: %s", err.Error()), 400)
		return
	}

	// Perform verification and issue an access token for id.Subject
	json.NewEncoder(w).Encode(&AuthMavisIDResponse{
		AccessToken: "Access token for " + id.Subject,
	})
}

func main() {
	http.HandleFunc("POST /auth/mavis-id", AuthMavisID)
	http.ListenAndServe(":3000", nil)
}
Install the required packages:
pip install flask requests PyJWT flask_json
Create a new Python file and add the following code:
from flask import Flask, request
import jwt
import base64
import json
from flask_json import JsonError, json_response, as_json
app = Flask(__name__)

app.config['JSON_ADD_STATUS'] = False

# Example client ID
client_id = "52b85454-dd6f-4b0f-8d7a-9e30a33e387e"

# Mavis ID domain information
issuer = "https://id.skymavis.com"
certURI = "https://id.skymavis.com/.well-known/jwks.json"

jwks_client = jwt.PyJWKClient(certURI, headers={'User-Agent': 'Python3'})

@app.post('/auth/mavis-id')
@as_json
def auth_mavis_id():

    body = request.get_json(force=True)


    try:
        id_token = str(body['id_token'])
    except (KeyError, TypeError, ValueError):
        raise JsonError(description='Invalid value.')

    signing_key = jwks_client.get_signing_key_from_jwt(id_token)

    # Decode the JWT token to get payload and header
    try:
        data = jwt.api_jwt.decode_complete(
            id_token,
            key=signing_key.key,
            algorithms=["RS256"],
            audience=client_id,
        )
    except:
        raise JsonError(description='Invalid ID Token.')

    payload = data["payload"]

    # Perform verification and issue an access token for payload['sub']
    return dict(access_token="access token for: " + payload['sub'])

if __name__ == '__main__':
    app.run(port=3000)
const express = require('express');
const jwksClient = require('jwks-rsa');
const jwt = require('jsonwebtoken');

// The Application Client ID (AUD) tag for your app
const clientId = process.env.SKYMAVIS_CLIENT_ID || '52b85454-dd6f-4b0f-8d7a-9e30a33e387e';
const issuer = process.env.SKYMAVIS_ISSUER || 'https://id.skymavis.com';
const certURL = 'https://id.skymavis.com/.well-known/jwks.json';

const client = jwksClient({
  jwksUri: certURL
});

const getKey = (header, callback) => {
  client.getSigningKey(header.kid, function(err, key) {
    callback(err, key?.getPublicKey());
  });
}

// authMavisId is a handler to verify a Mavis ID token and issue an access token
const authMavisId = (req, res, next) => {
  const token = req.body.id_token

  // Ensure the incoming request has the ID token
  if (!token) {
    return res.status(403).send({ status: false, message: 'missing required cf authorization token' });
  }

  jwt.verify(token, getKey, { audience: clientId }, (err, decoded) => {
    if (err) {
      return res.status(403).send({ status: false, message: 'invalid token' + err});
    }

    // Perform verification and issue an access token for decoded.sub
    return res.send({
        accessToken: "access token for " + decoded.sub
    })
  });
}

const app = express();

app.use(express.json());

app.post('/auth/mavis-id', authMavisId);

app.listen(3000)
Step 3. Issue an access token
After verifying the ID token, issue an access token to the user. The access token allows the user to interact with your backend server.
See also
ID Token and Access Token: What's the Difference? (auth0.com)